Monday, December 12, 2011

Chocolate cake with chocolate ganache

The cake I baked yesterday and decorated today with the chocolate ganache I also made yesterday. It's a first for me: No. Fondant!  The  roses (nor perfect, but then again what rose is perfect?) are made out of buttercream.


I wonder, for how long can chocolate ganache be stored??

Sunday, December 4, 2011

Chocolate cake

Cake I baked for a friend who asked me to bake her a chocolate cake for her birthday.  The cake is chocolate, covered in white (homemade) marshmallows fondant. The flowers were made the night before with a mix of gumpaste and fondant. The accents in the top are made from the left-over red gumpaste/fondant mix.  Very quick cake, I have to say.

Tuesday, November 29, 2011

Baby shower cake

Cake for a baby shower that I'm bringing today. One of the professors at our department is preggers and the wife of another is also expecting. Boy and girl, hence the color theme for both.  Hope they like it.


The botties are made out of gumpaste. The cake is covered in baby blue fondant with pink fondant accents. I still need to apply some clear glitter to make it shiny. It has baby bottles and teddy bears around.

Saturday, November 5, 2011

botties and turkey

Tried my hand at making baby booties out of gumpaste. They turned out really cute!  One of the teachers at the department is expecting a baby, and the wife of another is also pregers so we're throwing a double baby shower. I volunteered the cake.


And now my hands are killing me. I was trying to make two turkeys out of gumpaste but I guess I did my quota of kneading for today. The photo below is of the turkey I made the other night. I wanted to make two more.


I'm planning cakes for our department's luncheon, my family's gathering, and maybe one for Honors College (if they are planning something. So far I haven't heard anything).

I feel like a wimp...

Sunday, August 14, 2011

Cowboy themed cake

Actually it's a cowboy hat cake, but since I made another two (that were originally supposed to be the two bottom tiers) it ended up a theme cake. Does that make sense?

Anyway the cake
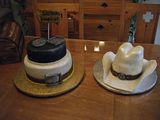
Carrot cake to the left, and the hat is chocolate


I started prep work for this cake weeks in advanced. I made these figures out of gumpaste testing the waters (and testing my new extruder) and also trying out silver luster dust with vodka.

My mistake was that I left them dry flat, instead of following the shape of the cake pan. *facepalm!*

So I went ahead and got me a ball of foam which I then cut in half and made another couple of figures and let them dry over the foam. Much better!
 

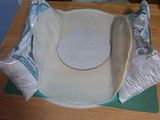
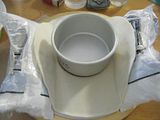
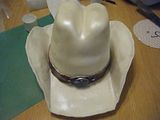
I then started to work on the hat. I was having problems rolling the fondant out and trying to get the form of a hat rim. The fondant was too elastic. (Fondarific). Then I tried with just the gumpaste (also Fondarific) and it didn't want to get thin enough. Then a friend of mine suggested to mix fondant with gumpaste. Since my fondant was an "antique white" I was concerned about the color, but not problem, the gumpaste got thoroughly mixed with the fondant and wow, what a difference! I then used a couple of powder sugar bags to help the rim keep its shape. I did that with plenty of days in advanced.  Next time I make a hat I have to remember to make the front in an angle.
 

The party was for Saturday, so on Thursday I baked all the cakes I thought I would need. After baking each cake was wrapped in plastic. For the cake I baked chocolate, for the intended base I baked carrot.  Since I was going to carve into the chocolate, those were stored in the fridge. It's easier to carve when they are cool.
   

Friday morning, the first thing I did was make a batch of creamcheese frosting. (Can't have carrot cake without it!) I then started to work on the chocolate cake.  Even though it was cool from the fridge, that didn't make it less messy to carve, but I did have less crumbs had it been left on my counter top. I then crumb coated that cake with the creamcheese buttercream and let me just say that chocolate cake + creamcheese frosting = big mess. But I got it done.

I then made a sigh out of gumpaste, using my pretty cool plastic mold that I have bought a few days before.
took me a while to get this imprint on

I then worked on leveling the carrot cakes and making layers, and I almost had heart failure when I saw how tall the 10 inch cake was. I realized then and there that I needed an extra layer for the 8 inch cake but at that time I was not going to bake anymore, so decided to work with what I have.


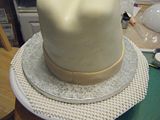
Then it was time for rolling out the fondant and try to cover the "hat". The Fondarific brand is very elastic, and it's easy to work with, but for this hat, since I was using "antique white" as I cover the cake I realized it was not a good choice for chocolate cake, because you could actually see the cake, even though I didn't rolled it too thin. I decided to roll some more and make it a double layer of fondant. I think it worked!


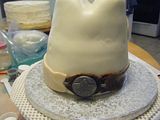
Looking at these pictures I realized I forgot to take a pic of just the cake without the belt. That belt was done with fondant to chich I added some brown, but I guess Fondarific is not made to add color or if you do, better use an air brush, so I ended up hand painting it. I actually liked the result. It gave it an old worn look. I then sprayed edible glitter to the finished cake.


I then got to work on the other cakes. By the time I was done I was TIRED, but very pleased with the overall look, except that I decided not to make it a triple decker because frankly it looked hideous when I tried it.

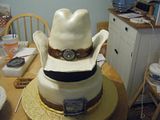
Not quite what I was looking for

So, when I got to the birthday boy's house and we put the cakes in the table, I asked him and his wife if they wanted the hat on top, and they said they actually liked the hat by itself. Whew!
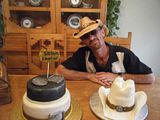
The birthday boy 

Speaking of the birthday boy, he spent the whole time thanking for me the cake and insisted on having a picture taken with me. So here it is!


More pictures on my Photobucket album

Sunday, August 7, 2011

Zebra themed cake

Cake I made this past week for my sister-in-law. It was my first time making the zebra theme.


Top tier is cream cheese, bottom tier is chocolate. Both are covered in fondant.  The white fondant is marshmallow fondant that I made the day before. The pink fondant was Satin Ice as well as the black.  I also applied vodka on the black fondant pieces to give them so luster as well as getting rid of any cornstarch.


Instead of doing the little balls by myself (and *ahem* after trying and failing miserably) I got me one of these handy Wilton molds and voila! instant border for the cake. Good investment there, and VERY easy to use.


The bow on top was made weeks ago for another cake I was planning but instead I made the Wonder Woman cake.  So I decided, since it was already made to use it to top this one.

Needless to say I was exhausted when I was done. But my sister-in-law loved it. So it was worth it.

Now to tackle my next project: cowboy cake for next weekend.

Saturday, June 25, 2011

Wonder Woman Cake

This is a cake I made for my brother-in-law Mario. He was so generous with hi birthday gift to me that I knew I had to bake him an awesome cake. At first he just told me to make it pretty and girly. (yeah, he's girly) But then hubby David, who as Mario's brother knows him pretty well, suggested the Wonder Woman theme.I asked Mario and he texted back with a big YES! so I got to work.

I looked around and found a cool cake in YouTube that I thought I could mimic. But looking at the cake I knew I'd need two cakes.

He has asked for a red velvet cake, so I searched online for a good recipe and decided to use the one by Paula Dean at the FoodTV website.  Very easy to do. I then decided to make my basic yellow cake, but since I was going to make cream cheese frosting for the red velvet cake I changed plans and baked a cream cheese cake. Th recipe was given to me by my aunt.


I used round pans for the bustier (the red velvet) and square pans for the pants (the cream-cheese cake). Then it was just a matter of carving. The results might be considered anatomically incorrect but hey! it is just cake!


Crumb coating the red velvet was a PITA, even though I left the cakes overnight on the fridge for easy carving. AS you can see in the pic above the red velvet cake looks like a science experiment gone wrong.

But in the end it was all worth it. I am very pleased with this cake. My only complaint is I wish I could have done the lasso differently.


More pictures here on my Photobucket

The idea for this cake I got it from this video:


Until the next one!!!

Sunday, June 19, 2011

BBQ themed Father's Day Cake

Cake I baked and decorated for Father's Day. Those small cans were a PITA to make because they are SMALL and I hand-painted the letters (Not a painter here).  Cake is basic yellow with a chocolate pudding filling. Covered in light green fondant with piped edges.  The figures were made a couple of days ago with fondant to which I added tylose powder.

Overall, I'm very pleased with how it turned out.


Happy Father's Day to everyone. I lost mine a couple of years ago, so I know he's smiling at me wherever he is :) Miss you Papi!

Cross posted at Cake Decorating and my Live Journal

Monday, June 6, 2011

Cake pops

They are labor intensive but not impossible. I used some left over buttercream I had in the fridge. Homemade buttercream is not as sweet as the store bought, IMO. I melted some CandyQuick chocolate, and made some pops. I ran into problems with the vanilla CandyQuick I bought so I decided to stop and do the rest for later. I'm thinking white chocolate should work better.


More pics here: http://s124.photobucket.com/albums/p30/alyrios/bizcochos/cake%20pops/

I confessed I'm a little bit hesitant about trying them so I'm gonna ask hubby and step-daughter to be my tasters later, LOL! (I did separated a itty bitty small one for me to try.)

Tutorials

http://youtu.be/JpIifr0VOxY
http://youtu.be/80PCMoL2xrM

Saturday, June 4, 2011

Cake done in a hurry

And by "done in a hurry" I meant exactly that.   I went to PR this past couple of weeks and my niece's birthday was during those days so I asked my mom if she could helped me with the cake. Since I didn't want to deal with the high humidity (humidity + fondant in PR = NOT a good combination) I decided to make it from the box and use store bought icing.  It goes against everything in me to use store bought icing, but I was not in my kitchen, I had had issues with the humidity in the past (last year to be exact. I don't know how bakers in the island deal with it, honestly) and like I said, it was a rather hurried cake.

I have to say I am actually please with the way it turned out. My mom baked the cake earlier and I took over the decorating. I basically decided to use one jar of vanilla white icing and one can of pink icing so I could do stars or flowers.  It was limited but It'll have to do. 


I frosted the cake and smoothed it as much as I could. While I was doing that the birthday girl have already arrived and she got to see me doing the pink stars along the edge of the cake with the canned frosting.  I decided to make it work for me. Simple as that. And my niece loved it, which to me was the most important part.


Wednesday, May 11, 2011

final cake, without papers!

Final pic of the cake with the special girl herself: my sister-in-law. She loved it, BTW.She specially liked the bow.

Saturday, May 7, 2011

Square cakes...

Are difficult to do.

Wow! I've never thought that it would be sooooo difficult to frost and apply fondant to a square cake.A friend of mine told me that's the reason a square cake tends to be more expensive than a round one. (not that is any easier to apply fronting and fondant to a round cake anyway...)

The cake is two tier, two layers yellow cake with cream filling. In very Puerto Rican cake tradition it has syrup inside.  (Most of my cakes are moist because I pour syrup right before starting to decorate.)

Pic below is the bottom tier already covered in fondant. If you REALLY notice, the corners are a bit of a mess.  Just a bit.


Both cakes have this problem, so my solution for this was to pipe stars in the corners.  But then I realized that I'd have to pipe ALL of the cakes' edges so it would look better.  So off to prepare more butter-cream and get the hand ready . Applying butter-cream is murder on my hands. Reason why I started to do the fondant.


So you can see in the second picture the top tier is already piped. I have to say I was very pleased with how it turned out. I haven't done any piping in years.


I then realized the cake looked like a baby shower cake for a baby boy. So I decided to add some pink roses to make it less " baby showery"

I think the roses help to make it more "Mother's Day" than baby. I hope!


The next thing was to make something for the top.  I thought roses but then I have looked at a cake at the Wilton site with this huge bow on top, so I wanted to try that.  And that's what I did.


The little papers inside is for the bow to keep its form while the fondant dries out.


 And here's the final cake.  Once the fondant dries I'll take out the paper, but I couldn't resist taking this pic.  I'll try to remember posting another pic tomorrow.

More pictures here in my photo-bucket album.